In this article, we will explain you more about how you can change Custom ID (Invoice Number, Estimate Number, Purchase Order Number, Credit Note Number) as per your choice.
Example of typical invoice id: INV-123
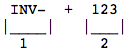
An ID/Number can be divided into two sections/parts.
1. Prefix – This feature lets you set prefix for the IDs. e.g. if prefix for invoices is set to be “INV-” then the Invoice with ID 3054 would appear as INV-3054.
2. ID – This is the number from which your invoices would be numbered. e.g. if your invoice ID is 3333 then the invoices would be numbered as 3333, 3334, 3335 .. & so on.
Example: INV-123. Where “INV-” is the prefix which is constant and “123” is number which will vary as it will auto increment further as you create new documents.
As displayed in above image, prefix of ID should not be numbers for example: 2020M123. “2020M” is the prefix in which “2020” is the year, so when 2021 will come we will need to change the prefix to 2021M due to which all the documents that are having id with prefix 2020M will be replaced by “2021M”.
So in order to avoid this, prefix should be constant because it is reflected on all the documents IDs (old and new documents). Prefix can be letters for example: INV-, INVO_, etc.
1. Set ID/Number from PDF Customization (Globally – for the entire company)
2. Set ID/Number from a document
- Globally – for the entire company
- Locally – for that specific document
Locally – for that specific document: If you save the ID/Number using checkbox it will have no effect on old and new Invoices IDs. It will not reset Prefix and Current Invoice Number/ID in Custom IDs. Changes in Invoice ID will only be applicable that specific Invoice.
iOS and Android #
You can change Invoice Number / ID as per your choice. It can be achieved via two ways that are mentioned above. First method can be done from website and mac app only. Lets see the explanation of Set ID/Number from a document methods in detail.
1. Set ID/Number from PDF Customization (Globally – for the entire company) #
- This method can be done from website and mac app only. Please refer Web and Mac section to know more about this method.
2. Set ID/Number from a document #
i. Globally – for the entire company #
- Suppose there is an Invoice who’s number you want to change, then open that Invoice.
- Tap on the rectangular ID: button located at the top next to Invoice title.
- Now edit the ID, enter Invoice Prefix and Invoice Number as per your choice and click on [icon name=”floppy-o” class=”” unprefixed_class=””] Save. Example: Saved Invoice ID: BILL-125.
- Saved Prefix: BILL- will also get reflected over all the Invoices IDs i.e old (already created).
ii. Locally – for that specific document #
- Changes in document’s id/number will not have any effect on other documents. Changes will only be applied to specific document.
- Open the Invoice.
- Click on the rectangular ID: button located at the top next to Invoice title.
- Now if you want to change the Invoice Number for a specific invoice then you need to tap on the [icon name=”square-o” class=”” unprefixed_class=””] Change only for this document. Changes will not reflect in other Invoice ID.
- Now enter a Invoice Number of your choice and click on [icon name=”floppy-o” class=”” unprefixed_class=””] Save now this number will not have any effect on other Invoices IDs.
Web and Mac #
- You can change Invoice Number/ID as per your choice. It can be achieved via three ways that are mentioned at the starting. Lets see the explanation of those three ways in detail.
1. Set ID/Number from PDF Customization (Globally – for the entire company) #
- From side menu Click on [icon name=”cogs” class=”” unprefixed_class=””] Settings -> Cusomization -> PDF Customization
- Click on Header -> [icon name=”pencil-square-o” class=”” unprefixed_class=””] Custom Ids Edit button.
- A popup will open. Enter Invoice ID Prefix with number.
- After entering both Prefix and Invoice ID of your choice click on Right/tick-mark button of popup.
- You set an ID/Number for each document seperately by going to that document’s tab and editing the ID/Number.
- Click on red colored Save button available at the top next to back arrow button.
- The Invoice ID Prefix that you will enter will get reflected in all the Invoices i.e. old (already created) and new (that you are going to create).
- Now if you create a New Invoice then that New Invoice will have Invoice Number and Prefix that you had entered in PDF Customization -> Custom IDs.
- Further creation of Invoices will have auto incrementally generated invoice number / ID.
2. Set ID/Number from a document #
i. Globally – for the entire company #
- Suppose there is an Invoice who’s number you want to change, then open that Invoice.
- At the top left corner above Due, Record Payment/Payments button you will see current invoice ID/document ID.
- Click on its ✏️ button.
- Now edit the ID, enter Invoice Prefix and Invoice Number as per your choice and click on [icon name=”floppy-o” class=”” unprefixed_class=””] Save. Example – Saved Invoice ID: BILL-130.
- This will reset the Prefix and Invoice ID in Settings -> PDF Options -> Custom IDs. Example – In Custom IDs it will get reset as Invoice ID prefix: BILL- and Invoice ID: 130 (current invoice ID:130).
- Saved prefix: BILL- will also get reflected over all the Invoices IDs i.e old (already created).
- Now if you create a new Invoice then that new Invoice will have Invoice number greater then previously edited Invoice Number by 1. Example: Previous edited Invoice ID: BILL-130. Newly created Invoice ID: BILL-131.
ii. Locally – for that specific document #
- Changes in document’s id/number will not have any effect on other documents. Changes will only be applied to specific document.
- Open the Invoice.
- At the top left corner above Due, Record Payment/Payments button you will see current invoice ID/document ID.
- Click on its ✏️ button.
- Now if you want to change the Invoice Number for a specific invoice then you need to click on the [icon name=”square-o” class=”” unprefixed_class=””] Change only for this document. Changes will not reflect in other Invoice ID.
- Now enter an Invoice Number of your choice and click on [icon name=”floppy-o” class=”” unprefixed_class=””] Save now this number will not have any effect on other Invoices IDs.


